
Just a little hello to let you all know I’m still here. My Blog site is still undergoing its reconstruction, it’s taking a little longer than we expected but it’s all good. I hope to be back blogging with you all very soon.
Until then
Zamamabakes
Thanks for your patience
Just wanted to check in and say hello. I’m still here!!! Thank you for your patience.
Things are taking a little longer than expected with the makeover of my Blog. Technology is quite the obstacle at times.
I would like to say a huge Thank you to the team at BCRE8IVE Media for all their efforts getting my Blog looking smarter and more productive. If anyone is looking for a fantastic digital media agency you need to get yourself in contact with BCR8IVE Media here.
Hoping to be back blogging with you all very soon.
Until then
Zamamabakes
Zamamabakes is going under a little makeover!!
Zamamabakes is going under some redevelopment over the next few days so I apologise for any inconvenience. The good news is I’ll be back with a refreshed Blog making it better for everyone!!!
I look forward to being back in touch as soon as the new developments are complete.
Thanks for your patience!!!
Until then
Zamamabakes
Quick and easy licorice allsort slice

Zagrandma loves licorice allsorts, needless to say she also loves this slice. If you know any licorice fans out there then this is a slice for them.
The best thing about this slice is how quick and easy it is to make. You don’t need to use the oven which is great when it comes to summer baking. It’s a great recipe to get the kids involved with, although you may end up a few licorice allsorts short if they are anything like Zakidlets!!!
Zagorgeous Aunty Gail gave me the inspiration for this recipe, she was the one who originally told me about the idea of a licorice allsort slice. After her telling me the basic idea and rough ingredients for the slice this is what I have come up with for the one I make.

You will need:
250g Scotch Finger Biscuits
40g melted butter
1 Tablespoon golden syrup
1/2 tin Condensed milk
125g licorice allsorts cubed into 1cm pieces (I cube each licorice allsort into 8 pieces)
Topping:
200g Dark chocolate broken up into pieces
50g butter

Process or crush biscuits to a fine crumb. (if you don’t have a food processor pop the biscuits in a snap lock bag and roll with a rolling-pin)

Add wet ingredients: Syrup, melted butter and condensed milk and process or mix until you have a very wet, sticky sand like consistency. (If you think mixture is a little dry just add a little extra melted butter until you can see it will easily press into a slice tin).

Add the licorice allsorts and fold thru with a wooden spoon.

Line a slice tin 18 x 28cm with baking paper and press mixture into tin.
Cover with foil and place in fridge for 20 minutes.

Mean while make up your topping. Combine chocolate and butter in a bowl over simmering water (the gentler heat helps the melting chocolate not to seize up) see how here. Stir until smooth, remove from heat.
Pour mixture over slice and spread out evenly with a knife.

To pretty up the slice you can peel dark chocolate over the topping like I have above.

I like a generous sprinkle of chocolate peels.
Place back in fridge for at least another hour before slicing into squares.

The finished product deeeeelicious!!!!
Store in an airtight container in the fridge for 1 week.
If you are not a fan of licorice allsorts just substitute something else for them instead like: cherry ripe, snickers, jersey caramels, pecan nuts, choc chips or a combination would work great too.
Whatever you do just have fun with it!!!
Don’t miss my Blog Post at the end of the week ‘Zagirlie Tea Party’ an inexpensive bit of home fun for the little people.
Until then my lovelies
Zamamabakes
Easy, Tasty Cheese Ball Recipe
Well hello again. Hope your week is going well. We have had a great week. I am still very much enjoying the fact that it’s school holidays and we are not having to stick to a strict schedule.
I promised this recipe to everyone last year when I revealed the menu for our 2013 Christmas day feast!!
This delicious little appetiser first found my attention 3 years ago when Zaunclejim featured it on his cheese platter for Christmas day. It was a fantastic hit, everyone loved it. I believe it was one of Zaunclejims gorgeous work colleagues who originally shared it with him a few years ago. We love it so much we asked Zaunclejim to bring another one for the 2013 Christmas feast just passed. I love a great recipe that finds its way to me, so thank you Zaunclejim and Zagorgeous work colleague.
I have made the Cheese Ball a few times now, most recently I made it and took it along to a baby shower I attended last weekend.
A recipe like this should be shared over and over. So here is me sharing it with you.

You will need:
250g cream cheese
125g triangle of Blue vein cheese
60g butter softened
1/2 cup sliced black olives (I used a combination of olives and semi sun-dried tomatoes)
3 shallots finely chopped
Approx 150g chopped walnuts, pecans or cashews (I used walnuts)

Combine all ingredients except for nuts (keep them aside) in a food processor (if you don’t have a food processor a hand mixer will do, mix cheeses and butter first until smooth, then add the vegetables).

Process/mix until evenly combined. It is meant to be a textured mixture so don’t over process or mix.

To make the mixture a little easier to handle I refrigerate it for about 1/2 an hour.

Prepare your nuts on a piece of baking paper.

Remove chilled cheese mixture from the fridge. I moistened my hands a little which made the mixture a little easier to work with.
NOTE: Depending on the size of Cheese Ball you want for your platter, this quantity has the potential to make 2 good size balls and possibly 4 smaller ones you may just need a few extra nuts for rolling.

Carefully place cheese mixture in a mound on top of prepared nuts. Just work the nuts up and around the mixture, then roll it over and continue to press the nuts all over until the Cheese Ball is well coated.

Once you have your Cheese Ball prepared wrap it in cling wrap and place it back in the fridge to firm up for at least 20 minutes.
The Cheese Ball will keep in the fridge for a good 5 days so if you want to prepare it ahead of time you can.

I made a smaller ball for Zadada and I, as well as the larger ball to take to the baby shower pictured below.

I love colour so I served the Cheese ball with some raw veggies as well as some crackers.
I had a lovely morning at the baby shower.
You really need to put this recipe on your to-make list, you won’t regret it.
Next up in the Blog Post pipeline is an easy sweet treat involving licorice allsorts.
Until then
Zamamabakes
A home made fabric baby rattle
If you own a sewing machine but rarely ever use it like me, this little sewing project may well be for you. I am going to apologise in advance for not using the correct sewing jargon, but as I said in my previous post here the extent of my sewing education is year 9 & 10 textiles and design at high school. I finished year 12 in 1996 so that gives you an idea of how long ago my sewing education took place. I had a very talented teacher her name was Mrs Forsyth she was fantastic! I on the other hand take lots of pride in the way I thread a needle and feed a bobin, the rest is a bit hit and miss. I love trying to attempt little sewing projects when I have the time.
This little sewing project ‘The baby horse Rattle’ is something I have now made 4 of (don’t go overboard there Zamama!!), it’s all about pacing yourself and I’m sure you know what I mean. The first rattle I made was for our 3rd little one, Alani and since then I have made 3 as gifts which have been received with much appreciation (there’s something extra special about giving a gift you have made yourself).

The little rattle above I made just last week to include in a baby shower gift for my lovely friend Sally expecting her first little girl. I made the rattle up in an evening, taking me about 2 hours in total. For an experienced seamstress it would probably only take 1/2 an hour!!! (hehehe) it’s all about having a go.

You will need:
2 x pieces of cotton fabric 30cm in length and 15cm in width (to be safe)
7 x 11cm lengths of ribbon
2 little craft bells (approx 1.8cm diameter)
pillow filling (I just used a very basic filling I found loose in my sewing bag)
Of course your sewing machine, some pins, baking paper, needle, thread, scissors, a pen and some patience will also come in handy!

As you can see I traced a very basic outline of a horse onto a piece of baking paper 21cm length x 8.5cm at the widest point. You can pretty much use any shape and size you like and just follow the general instructions as a guide.
Once you have your rattle shape traced and cut now becoming your pattern, pin it to your 2 pieces of fabric right sides touching each other as pictured.
Before you cut your fabric remember to leave an extra 1.5cm for your seam allowance (meaning cut the fabric 1.5cm wider then the pattern as pictured above.

Separate the 2 pieces of cut fabric and place them right side up, you should end up looking at a mirror image of the shape.
Select one piece of cut fabric (it doesn’t matter which one) and pin your 7 ribbons folded over in thickness, aiming 6 of the ribbons inward down towards the centre of the horse’s head and 1 ribbon inward and down towards his front foot as pictured, also making sure the open ends are facing the outside of the cut shape, (sorry if this sounds confusing ,hopefully the picture above brings it together).

NOTE: I only used a basic straight stitch for the entire project.
You now need to sew the ribbons in place. You need to sew close to the edge about 3mm in as it is just to hold the ribbons in place for when you sew your 2 pieces together (saves the complications of them moving all around and getting caught up).

This is what you should end up looking at up the head end.

Again lay your 2 pieces of fabric right side up as shown.

Now pin the right sides together again. Trace a rough sewing seam line to guide you where to stitch, I marked mine about 1cm in with a pen lightly.

Stitch the seam starting on the inside of one leg and finishing on the inside of the other leg, remembering you need to leave an opening big enough for turning the fabric through the right way and also being able to fill the rattle with the pillow filling and bells.
There are quite a few curves with this shape. I found using the needle as a pivot useful for manoeuvring (a little bit of stopping and starting but worth it).
Once the machine stitching is complete you need to trim all your edges, so they are not too bulky when you turn them through.

Your next challenge is to turn your little horse in the right way. You just have to work with delicate hands. This part does take a little patience and shuffling, you will get there, I found the blunt end of a pencil helped to push the limbs and head right out.

Carefully press your horse out with an iron (only use a cool setting as you don’t want to scold the ribbons like I did with my first attempts).

Fill the horse with the pillow stuffing incorporating a bell centrally into the head and 1 centrally into the main body, but make sure the stuffing surrounds them well.

Again the pencil comes in handy for packing in the filling snugly.

Once you have a well filled out horse, you need to stitch/bind up the opening with a needle and thread. Just leave a pinch of loose fabric in the crutch area (remove a little filling if need be) so you have a good enough edge to stitch through. This bit is a little tricky, you need to turn the raw edges in on themselves so from the outside they look closed. I doubled back over my first lot of stitching just to be sure the closure is secure and durable.

The finished product front side and back.
If any of you find or know an easier way to do any of this little craft project please let us all know, I appreciate any constructive critism.
On that note it’s off to shower Zakidlets and get dinner organised.
I am looking forward to sharing a fantastic easy Cheese Ball recipe with you all on Sunday, it’s delicious!!
Until then,
Zamamabakes.
Salted Caramel Brownie Sandwich Cookies
‘Sharing is caring!’, I love this saying especially when it involves a great recipe that someone thoughtfully brings to my attention.
Zagorgeous Aunty Gail is the beautiful soul who surprised me with a copy of this amazing Donna Hay recipe in my Christmas card. Earlier last year Zaauntygail visited our family and brought a batch of these delicious morsels along with her to share. When I Sampled my cookie all I could say was ‘Mmmmmmmm I want this recipe’. Some of you may already be familiar with Donna’s ‘Salted Caramel Brownie Sandwich Cookies’ for those of you who are not you need to become familiarised, they are devine. If you are like me and love chocolate and salted caramel you need to bake a batch of these cookies or find someone who can bake a batch for you.
I made a batch up this week and took them along to an afternoon tea I had been invited to. They got great feedback.

You will need:
350g dark chocolate chopped (I used a 200g block Coles dark chocolate and used dark chocolate chips for the remaining 150g)
40g unsalted butter (I prefer standard butter I like the fuller flavour it gives)
2 eggs
2/3 cup caster sugar
1 teaspoon vanilla extract (I used 1/2 teaspoon vanilla bean paste)
1/4 cup plain flour, sifted
1/4 teaspoon baking powder, sifted
For the frosting:
3/4 cup caster sugar
1/4 cup water
1/2 cup pouring cream
150g unsalted butter, chopped (again I used standard butter)
sea salt flakes for sprinkling

Preheat oven to 180C (I did 170C for fan forced).
Place 200g of the chocolate (use the block chocolate for this part) and the butter in a small saucepan over low heat and cook stirring frequently, until melted and smooth (when melting chocolate I like to do it over a pan of simmering water, it’s a much gentler heat). Set aside.

Place eggs, sugar and vanilla in an electic mixer and whisk for 15 minutes or until pale and creamy.

This is how my mixture looked after 15 minutes of whisking.
Stir through the flour, baking powder, chocolate mixture and remaining chocolate (this is where I used the chocolate chips) and allow to stand for 10 minutes.

Chocolate mixture.

Drop tablespoonfuls of the mixture onto baking trays lined with non-stick baking paper, allowing room for spreading. Bake for 8-10 minutes or until puffed and cracked.

Allow to cool completely on trays.

To make the salted caramel icing, place the sugar and water in a medium saucepan over low heat and stir with a metal spoon until the sugar is dissolved. Increase heat to medium and bring to the boil. Cook for 8-9 minutes or until golden (I set the timer and sat with the caramel while it was boiling away, as soon as you see it start to get that golden tinge remove it from the heat straight away so it doesn’t burn). Once caramel is away from the heat carefully add the cream and butter (I stress carefully).

When I added the cream and butter I ended up with a big hard clump of toffee in the saucepan but I just followed the recipe directions of returning the saucepan to the heat and stirring until the mixture was smooth again (this process took me a good 10 minutes or more).

Remove saucepan from heat again. I allowed my mixture to cool to room temperature I then placed it in fridge and left it to cool completely (for me this was overnight) as I was getting tired and it was past my bedtime. The picture above show the caramel ready for the fridge and post overnight refrigeration.

Place mixture in a mixing bowl and using an electric mixer whisk the mixture until soft peaks form.
Spread half the cookies with the frosting, sprinkle with salt and sandwich with remaining cookies.
Recipe says you should get 12 (I got 11.5).

Voila!!!
I will just say enjoy, enjoy, enjoy and as Zasister would say YOLO!!!!
Coming up on the Blog next week is a little bit of Zamama sewing action (scary I know, as in no way am I an experienced sewer, year 9 and 10 textiles & design is the extent of my training!). I also Plan to share a delicious savoury appetizer with you all.
Until then
Zamamabakes
Roast Pumpkin Rocket Salad
This was one of the salads I made for our Christmas feast (it’s up there on my list of favourite salads). I love salads that combine a great selection of ingredients and this is one of them. It’s not the cheapest salad to make as far as the cost of ingredients goes but you pay for what you get, its delicious.
Zagorgeous Cathy a work colleague and friend from Patrick Egan Optometrist shared this recipe with me a couple of years ago and every year since I have made it for Christmas lunch as well as a lot of special occasion BBQ’s. I love it when others ask me for the recipe, to me that’s what its all about, sharing the love and great recipes!!

Your List Of Ingredients
1kg butternut pumpkin (This week I used a 1kg combination of pumpkin and sweet potato)
4 cloves unpeeled garlic
1 tablespoon olive oil
Salt and Pepper to taste
6 slices prosciutto
2 bunches asparagus trimmed
200g baby rocket leaves
1/2 cup shaved parmesan cheese
1/3 cup pine nuts, toasted (I usually cheat and buy the ready roasted pine nuts)
200g snow peas, thinly sliced
DRESSING
2 tablespoons olive oil
2 tablespoons red wine vinegar
2 teaspoons Dijon mustard
1 teaspoon sugar
2 teaspoons chopped fresh thyme

Peel pumpkin and chop into 3cm pieces (mine always seem to end up a little smaller). Place pumpkin into a baking dish with garlic. Drizzle with oil, season with salt and pepper. I then give the pumpkin a toss around on the tray with my hands to make sure it is evenly coated with the oil.
Cook in a moderately hot oven, 190C, for about 25-30 minutes until pumpkin is tender and browned, turning the pumpkin at the 15 minute mark helps keep the process even.

This is what you should see post roasting.

I pop garlic out of the skin and shred it up and gently fold through the pumpkin for extra flavour.
I actually completed the pumpkin roasting step the night before I assembled the salad, I do this every Christmas too. Just pop roasted pumpkin and garlic in an airtight container in the fridge.

This is where I prefer to purchase all my fresh fruit and veg, ‘Tweed Fruit Exchange’. You can always be sure of getting great produce and customer service. I was served by Zagorgeous Lee this week, thanks guys I’m sure I’ll be back again before the week is out!

This is where I picked up to finish off the salad on Monday night.
Boil, Steam or microwave asparagus until just tender (I microwave in a steamer for 2 minutes on high). Rinse under cold water, drain well.

My thinly sliced snow peas.

Cook prosciutto in a heated greased pan (I just use a non-stick pan and no greasing) until browned all over and crisp. drain on paper towel. Roughly crumble into bite sized pieces.

Unfortunately Toasted pine nuts were not available at the supermarket this week so I had to do my own. As you can see from the before and after shot they ended up a little toastier then I would have liked but they were fine.

When chopping the thyme I strip the woody stalks and discard them, using just the leafier remains.

DRESSING
Combine all ingredients in a screw top jar (I use a trusty Tupperware cup and lid), shake well.
Assemble the salad as shown (I mix all the greens and make them the base of my salad, I then top with pumpkin followed by the prosciutto then the parmesan, scattering the pine nuts on top and lastly drizzling the dressing over the top. Alternatively you can gently toss all the ingredients together.

I served the salad with a side of BBQ chicken. Perfect for a warm summer evening.
I hope you enjoy this as much as we do, its delicious.
Stay tuned for my upcoming Blog Post this Sunday for ‘Salted Caramel Brownie Sandwich Cookies’.
Until then,
Zamamabakes
Our Festive Celebrations for 2013
Well hello there!!! Welcome back lovely readers.
Happy New Year to you all!!!
I can’t believe it’s now 2014. Christmas is all done and dusted for another year. Thank goodness Christmas only occurs once a year, I love it, but physically, financially and mentally I think once a year is more than enough for everyone (I believe the next 12 months is to recover).
We had a fantastic festive break, sharing it with beautiful family and friends. I feel truly blessed to be part of such a special network of people. I did promise a post-Christmas Blog Post so rather than waffle on (like I usually do) I think I will let the pictures do more of the talking today.

It was a group effort putting our Christmas day feast together. This was some of the kitchen action on Christmas Eve. Zasister, Zagrandma and Zakidlets all doing their bit. Zadada was doing plenty behind the scenes, taking these pictures, tending to the outside maintenance and keeping Zakidlets entertained.

I love a pretty Christmas table. This year I used a mirror as part of my centre piece on the table (an idea I found on pinterest). I was really happy with how it all turned out.

Tradition in The Zamamabakes household is to attend Mass on Christmas Eve. We managed a quick bite to eat before hand, the kids request of course, but it was lovely to just sit and have a few moments as our family of 5.

We had to leave some treats out for Santa and his Reindeer. The banana and strawberries on the plate was my attempt to Christmas Brekky a little (some more pinterest inspiration).

I love watching the kids discover their gifts from Santa on Christmas morning.

This was our group for Christmas lunch. Zasister, Zagorgeous Aimee, Zabrother, Zadada, Zamama (me), Zapop, Zagrandma and of course Zakidlets our little cherubs Alani, Blake and Ella. Missing from the picture is Zauncle Jim, he was behind the camera for this shot.

Some yummy morning appetizers! I made sure I had that glass of champagne (a Christmas gift from Zasister last year). We had a delicious Cheeseball Zauncle Jim made I intend on sharing the recipe as soon as I can.

This is some of what was on offer for lunch, dinner and lunch again on boxing day!! So much food, so delicious.

Zakidlets table and the rest of us.

Dessert was scrumptious another great group effort.

And just in case you felt like something else sweet we had Zanan’s Trifle, Zagrandma’s fruit cake and a tray of yummy homemade chocolates.

It’s not Christmas without a spot of cricket, I chose to spectate and ensure the electric fence was switched off!!!

How could we forget Zapuppydog!! Blake found this dog shirt at the reject shop before Christmas, wrapped it up and put it under the Christmas tree for Locky. It was a little on the tight side so it was on long enough to take a picture. I think Zapuppydog needs to lose a little weight, (his New Years resolution perhaps).

Boxing day brought some motor biking action.

As well as some construction action.
Lots of fun was had by all involved.

For Christmas Zagrandma and Zapop, Zanan and Zapop as well as Zadada and Myself all put in to purchase a climbing fort for Zakidlets. The only thing was it came flat packed.

The day after boxing day we had a working bee that went for 12 hours (I happened to be in at work for 8 of those hours). I still managed to lend a bit of a helping hand when I got home (I think) for a few brief moments at least (I fitted in the fort a little more comfortably than Zadada), they even let me loose with the drill!!!

The finished product with some very happy owners!!
Thank you to Zanan, Zagrandma, Zapop and Zadada for making this happen all in a day!!!
For those interested we purchased the climbing fort from climbingframes.com.au the ceder climbing frame specialists. See details here. We are extremely happy with it so far.

We also managed a beach trip during the festive break. We had a great day!!!

Before we knew it a week had passed and a new year was almost upon us. We stayed at home sharing New Years Eve with some lovely friends.

New Year celebrations are not complete without Dessert!! In fact no celebration is complete without dessert!! I made an easy Chocolate, cream and berry log, it’s a bit of a cheats dessert, great when you are a little time poor and is always yummy!!
I am looking forward to sharing some recipes from the festive break soon.
While the kids are on holidays things may be a little hit and miss, I will do my best.
It’s great to be back, stay tuned.
Zamamabakes
What’s cooking at Zamamabakes house on Christmas Day?
The fact that we are only 4 days out from Christmas, I thought what better way to sign off on 2013 then to give you a little insight into a Christmas hosted by the Zamamabakes household.
This year we are doing things a little simpler (I think??).
Zagrandma (my Mum) always comes to join me in my kitchen on the day of Christmas eve, we play Christmas carols, dance around and do lots of Christmas cooking together. Its busy and lots of work but we love it. We usually manage to fit a festive drink in there somewhere too.
We will have a variety of guests Christmas day including Zagrandma, Zanan’s, Zapop’s, Zaaunt’s, Zauncles, Zachick, Zacousins.
Like most we make Christmas lunch our main meal of the day and for lunch I am expecting 8 adults plus 3 Zakidlets!! 2 Years ago we had 24 for lunch, it was hectic but lots of fun.
Tradition is to have a cold buffet of salads, ham, prawns, chicken and whatever other meats we decide to have sometimes turkey, sometimes pork it just depends on how complicated and time-consuming we want to make things ha ha. All the dining guests usually get delegated a dish or 2 to bring along which works out perfectly giving us a great selection of food to enjoy!
Zakidlets usually start their day with a ‘sometimes breakfast’ of Coco Pop’s, note the SOMETIMES!!!! They love them for a treat. I am also planning to surprise them with some fresh fruit candy canes made with real strawberries and banana’s.
Our guests will start to arrive around Mid-Morning which will hopefully give us enough time to get the house respectable after a morning of Santa Claus Surprises!!
This is our basic line up of food for the day,
Starters:
Cheese platter, including an amazing cheese ball (courtesy of Zagreatunclejim).
A few savoury snacks including a serve of my ‘Nuts and Bolts’ to nibble on.
I am hoping to make a serve of the delicious looking Prosciutto and bocconcini skewers pictured below. I found the idea here at taste.com.

A glass of bubbles is a must and always goes down a treat in the lead up to lunch.
For Main the plan is:
Fresh cooked prawns
Chicken (this year I am trying a smoked chicken from our local butcher, he does his own smoking). Zagrandma is going to bake up a chicken roll (the ones you get at the supermarket with the stuffing inside)
Maybe a Roast Pork with apples and cider see recipe here, will just depend on whether or not time permits.
Christmas Ham (you can’t do Christmas without ham)
Salads and Sides
Roast Pumpkin Rocket Salad (I have not done a post on this recipe yet, sorry 😦 so stay tuned for it in my early Blog posts in 2014)
Potato salad being made by Zaauntkayla see recipe here
Wombok crunchy noodle salad (you’ll find the recipe on the back of a pack of Chang’s refried noodles) being made by Zabeautiful Aimee.
Cherry tomato, cucumber and green bean salad see recipe here
Beetroot Salad (Baby spinach leaves, tinned baby beets drained, feta crumbled, creamy garlic dressing from the supermarket, topped with chopped walnuts)
Fried Rice (ZaPop’s specialty, he even puts twiggy sticks in it)
Seafood Salad (Zaunclebrad’s favourite, he has this task)


Dessert (Yum)
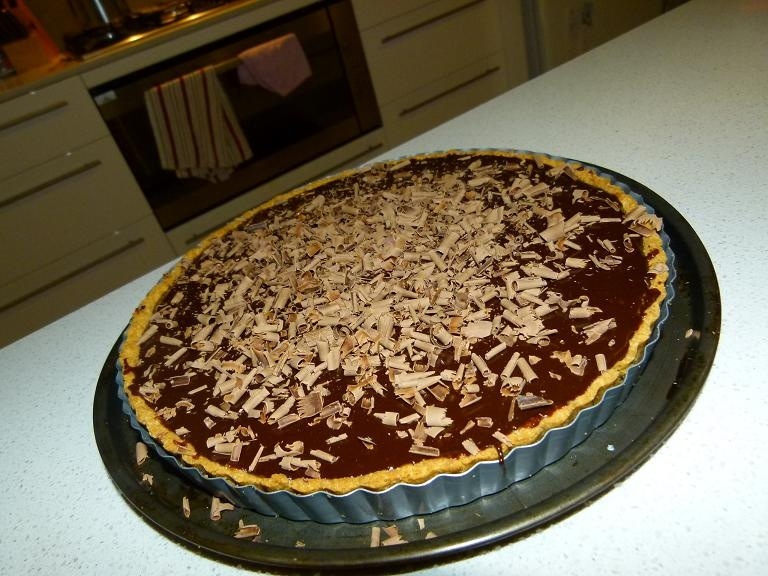
Chocolate Caramel Shortbread Tart recipe here.
Persian Love Cake (delegated to Zabeautiful Aimee) recipe here.
Zagrandma is making a Lemon Meringue Cheesecake (one of my favourites) I’ll post recipe 2014.
A nice fresh fruit platter is always a good option to have on hand.
Then you just have to have a selection of yummy treats to snack on in case you’re still hungry!!!! Rocky Road, Truffles, White Christmas, Chocolate caramel balls, Christmas Jellies (I get these at the kids Christmas Tableau and freeze til Christmas). Zagrandma always makes a delicious Christmas cake which goes perfectly with a cup of tea.

I think that is just about everything covered!!! The added benefit of an indulgent Christmas feast is eating the leftovers for a few days after Christmas. I’ll be sure to give you a report of how things go in a few weeks time, NEXT YEAR!!!!

For now I would like to say Merry Christmas and Happy New Year to all my beautiful reader’s. I wish you all a very safe and enjoyable festive season.

Zapuppydog sends his best Christmas wishes too!!!
Until 2014
Zamamabakes xxxx
